


Finally cracked the code to Truly Crispy Salt and Pepper Squid!! The fry batter is so crunchy it stays crispy even when it’s gone cold, and it’s not at all greasy. There’s no complicated steps or ingredients. Just a specific ratio of flour to cornflour plus an all-important 30 minute refrigeration for the batter!

WHY THIS SQUID IS SERIOUSLY CRUNCHY!
-
Specific ratio of cornflour (cornstarch) combined with regular flour for ultimate crunch in a very short frying time so the squid doesn’t overcook.
-
A touch of baking powder keeps the batter light rather than dense.
-
We tested other starch options – rice flour, potato, tapioca – but the texture and/or crispiness wasn’t as good.
-
Resting the batter develops gluten so it clings to slippery squid better and the crust isn’t greasy or chewy.
-
The shock of chilled batter hitting hot oil makes a crispier crust.
-
Double frying – rapidly become the worst kept Asian secret for ultra crispy not-greasy fried foods!
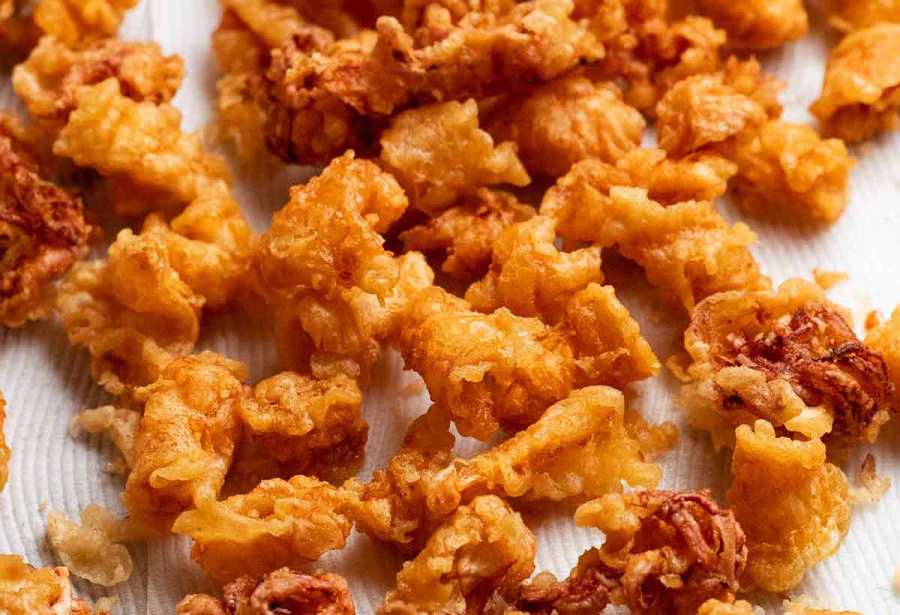
Ultra Crispy Salt and Pepper Squid
It only took us 3 years to crack the ultimate, truly crispy Salt and Pepper Squid! Hand on heart, this is crispier than any fried squid I’ve had in a restaurant, ever. And I have tried a lot. Once I had my sights set of creating a great Salt and Pepper Squid recipe, I would never pass up an opportunity if I saw it on a menu.
95% of the time, they just weren’t crispy at all which is so disappointing, and all too often they were really greasy. The 5% of the time that they were crispy, the crispness really only lingered for just enough time to eat the bowl of squid – provided you ate very quickly!
Well, our hunt for crispy squid is finally over. It is here today, and it’s incredible! The fry batter is light, super crunchy and not greasy at all. In fact, it’s so crispy it stays crispy even when it’s stone cold!
** If you’re interested in the recipe development process, see the blue box below the ingredients section for more information where I’ve indulged in some background information!**

Ingredients
Here’s what you need to make Crispy Salt and Pepper Squid.
The squid
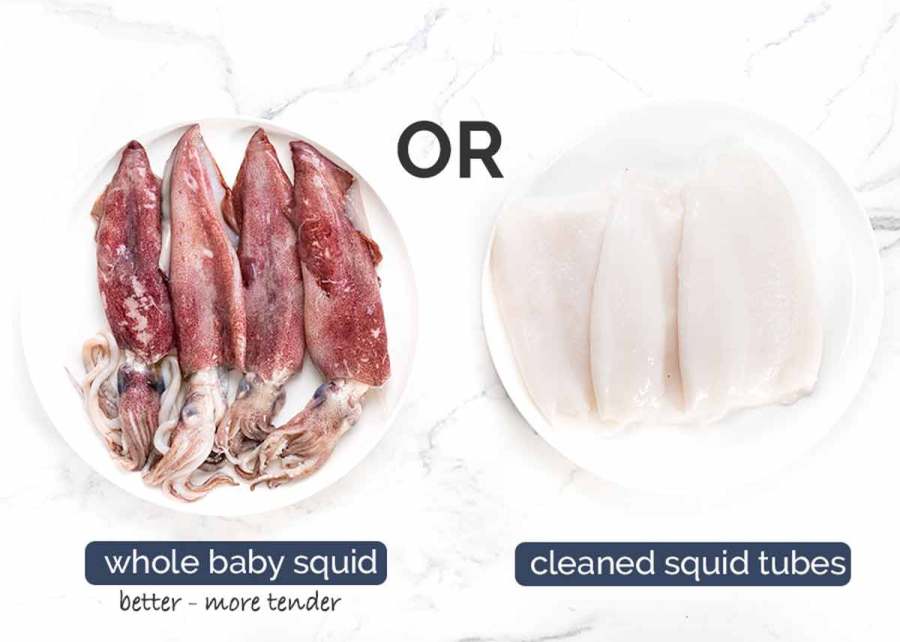
You can use either squid tubes that are sold already cleaned (right, below) or whole baby squid (left) which needs to be cleaned before use (ask your fish monger or do it yourself). Baby squid is nicer because the squid flesh is thinner and more delicate so it’s softer. Plus, the tentacles are the crunchiest! But by no means are cleaned squid tubes a poor cousin.
-
Baby squid is sold whole with the head and tentacles attached, and the skin on, as pictured. They range in size but the ones pictured have a body and head about 20 cm / 8” long and tentacles roughly the same length.
The body (the tube part) and the tentacles are the edible parts. You can either ask your fish monger to clean the squid for you or do it yourself, see my separate tutorial here. It involves: removing the skin, cleaning out the guts, removing the cartilage and beak, and removing the head.
-
Squid tubes – Sold pre cleaned, sparkling white tubes ready for use! Handier, but it is less tender than baby squid simply because the meat comes from a larger, older squid so it’s thicker. It’s just like animal meat – younger, smaller animal = softer meat, but meat from older animals is by no means tough and chewy if cooked correctly. (And yes, we cook the squid correctly!!)
The crispy batter for squid
We found that the key to the ultra crispy batter for squid came down to using the right flours (cornflour + regular flour), the perfect ratio and the clincher: refrigerating the batter for 30 minutes. If you’re a food nerd like me who is interested in the logic of the why this batter works, read below for more information!
-
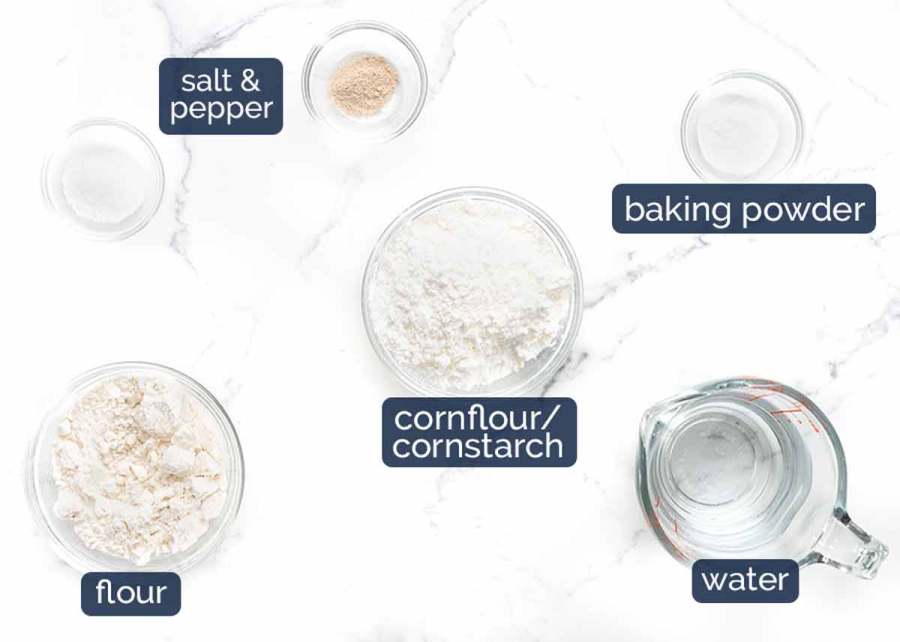
Flour and cornflour/cornstarch – Just regular plain flour (all-purpose flour). We use a very specific ratio of each to achieve the right level of crispiness and golden colour. This is because cornflour makes things crispy but won’t fry up golden, and if you use too much, the batter is chewy and gets stuck in your teeth. On the other hand, flour batters fry up beautifully golden but are not as crispy, and they soften so quickly. So I use both!
-
Baking powder – This makes the batter puff up a bit to make it lighter rather than dense.
-
Regular tap water – I use ice cold soda water in other fry batters as a secret trick for crunch. But for this recipe because we need to refrigerate anyway, there’s no need to use cold water. And there’s no point using fizzy water because the fizziness would not last for the refrigeration time.
-
Salt and pepper – for seasoning.
BACKGROUND: DEVELOPING the batter for squid
I really thought it would be as simple as using the battered fish or Chinese Honey Chicken fry batters, but they just weren’t suitable for squid! Partially because squid are slippery little suckers which require a batter that clings better, and also because it cooks faster so the batter has to be designed to crisp up in a shorter time.
The starch is the biggest variable
When it comes to fry batters, the thing that affects the crispiness the most is the starch used. Regular flour will make batters that clings to food well and it fries up into a lovely golden crust. But it does not go as crispy as cornflour (cornstarch) and other gluten-free starches such as rice flour and potato flour.
After eliminating rice flour, potato flour and others we tried such as tapioca, we landed on cornflour as the best starch to combine with regular flour. Why not just use cornflour, if it fries up so crunchy? Because the crust will not fry up golden (it stays white which is not as appealing) and though crispy, the texture is tough and gets stuck in your teeth.
So basically, we had to play around various ratios of regular flour and cornflour until we came up with the right combination that delivered a light, very crispy crust with the right amount of crunch, the right golden colour and an acceptable crunch staying-power.
Early iterations we made were either too tough, too chewy, too fragile and many, many versions we made were simply not crispy enough!
Fridge batter resting
And the final key to unlock the door to the world of ultra crispy salt and pepper squid was to refrigerate the batter. Most of my other fry batters rely on ice cold soda water to chill the batter (leading to crispy crust when shocked by the hot oil) and for the fizz to provide some lift.
However, for the squid batter, we found it was best to rest the batter for 30 minutes to allow the gluten to rest and develop so the batter would cling to the slippery squid better. In doing so, this chilled the batter so using cold soda water wasn’t necessary, just regular tap water was fine. And a smidge of baking powder took care of the lift part!
PS “We” is RecipeTin’s Chef JB and me. It was mostly JB who did the groundwork with me beside him on the crispy squid journey, eating and analysing and problem solving. For recipe development projects like this we approach it in a very methodical way, changing one variable at a time and doing lots of research, like the frying characteristics and liquid absorbency of different starches. I know, I’m SUCH a dork!
~~~ END of nerdy food talk 😅~~~
How to make salt and pepper squid
Cutting the squid
If using cleaned squid tubes (pictured above), you can start with these steps immediately. If you have whole baby squid (with the skin, head and tentacles, you will need to clean it first. See the separate post on how to clean and prepare baby squid here.
-
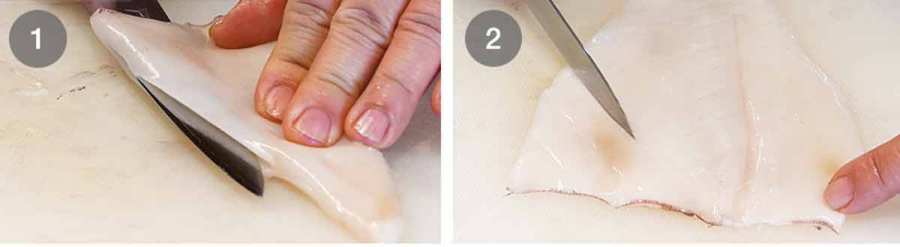
Cut down one side of the tube so you can lay it out flat. Pat both sides dry with paper towels.
-
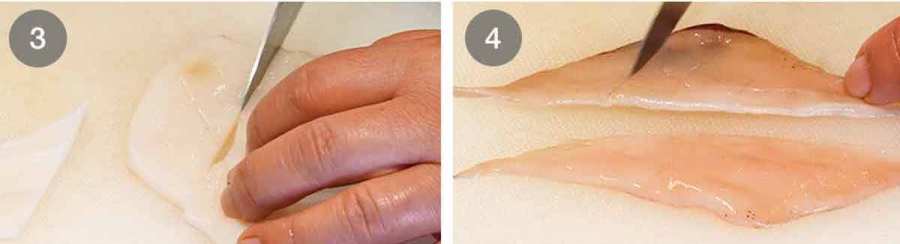
Score – Lightly score the flesh using a small sharp knife into 1.5cm / 0.6” diamonds. Take care not to cut all the way through. Scoring the flesh creates more ridges so the squid fries up crunchier and allows it to cook faster and more evenly which means more tender squid.
-
Rectangles – Then cut the squid into rectangles about 5 x 2 cm / 2 x 1” in size. Exactness isn’t important here.
-
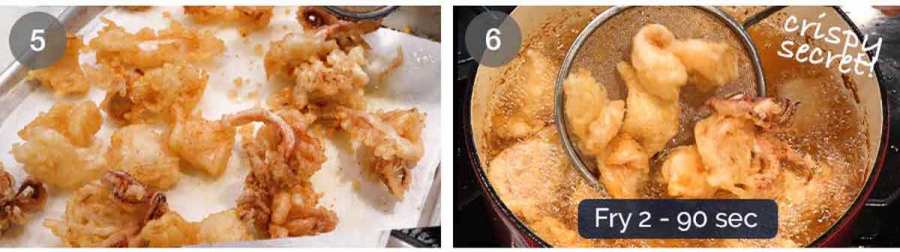
Wings – If you used baby squid, score the wings too (the flappy bits pulled off the tube) then just use them whole. You don’t need to do anything to prepare the tentacles though you could separate them if you want so you get more tentacle pieces. They are the crunchiest bits after all, everybody wants them!
BATTERING & FRYING
This is actually a good recipe to start with if you are new to oil frying because small pieces of squid are easy to handle and it cooks in just a couple of minutes. Much easier than, say, Southern Fried Chicken!

-
Batter – Whisk the flour, cornflour, baking powder, salt and pepper. Then whisk in the water until lump free.
-
Refrigerate for 30 minutes. Do not skip or shortcut this step! It’s important to give the batter time for the gluten to develop which will make the batter cling to the slippery squid better as well as frying up nice and crisp, rather than chewy and greasy.

-
Batter up – Put all the squid into the batter. We will fry them in 3 batches and the remaining squid can stay in the batter while you fry.
Pick up a piece of squid and let the excess batter drip off for a second.
-
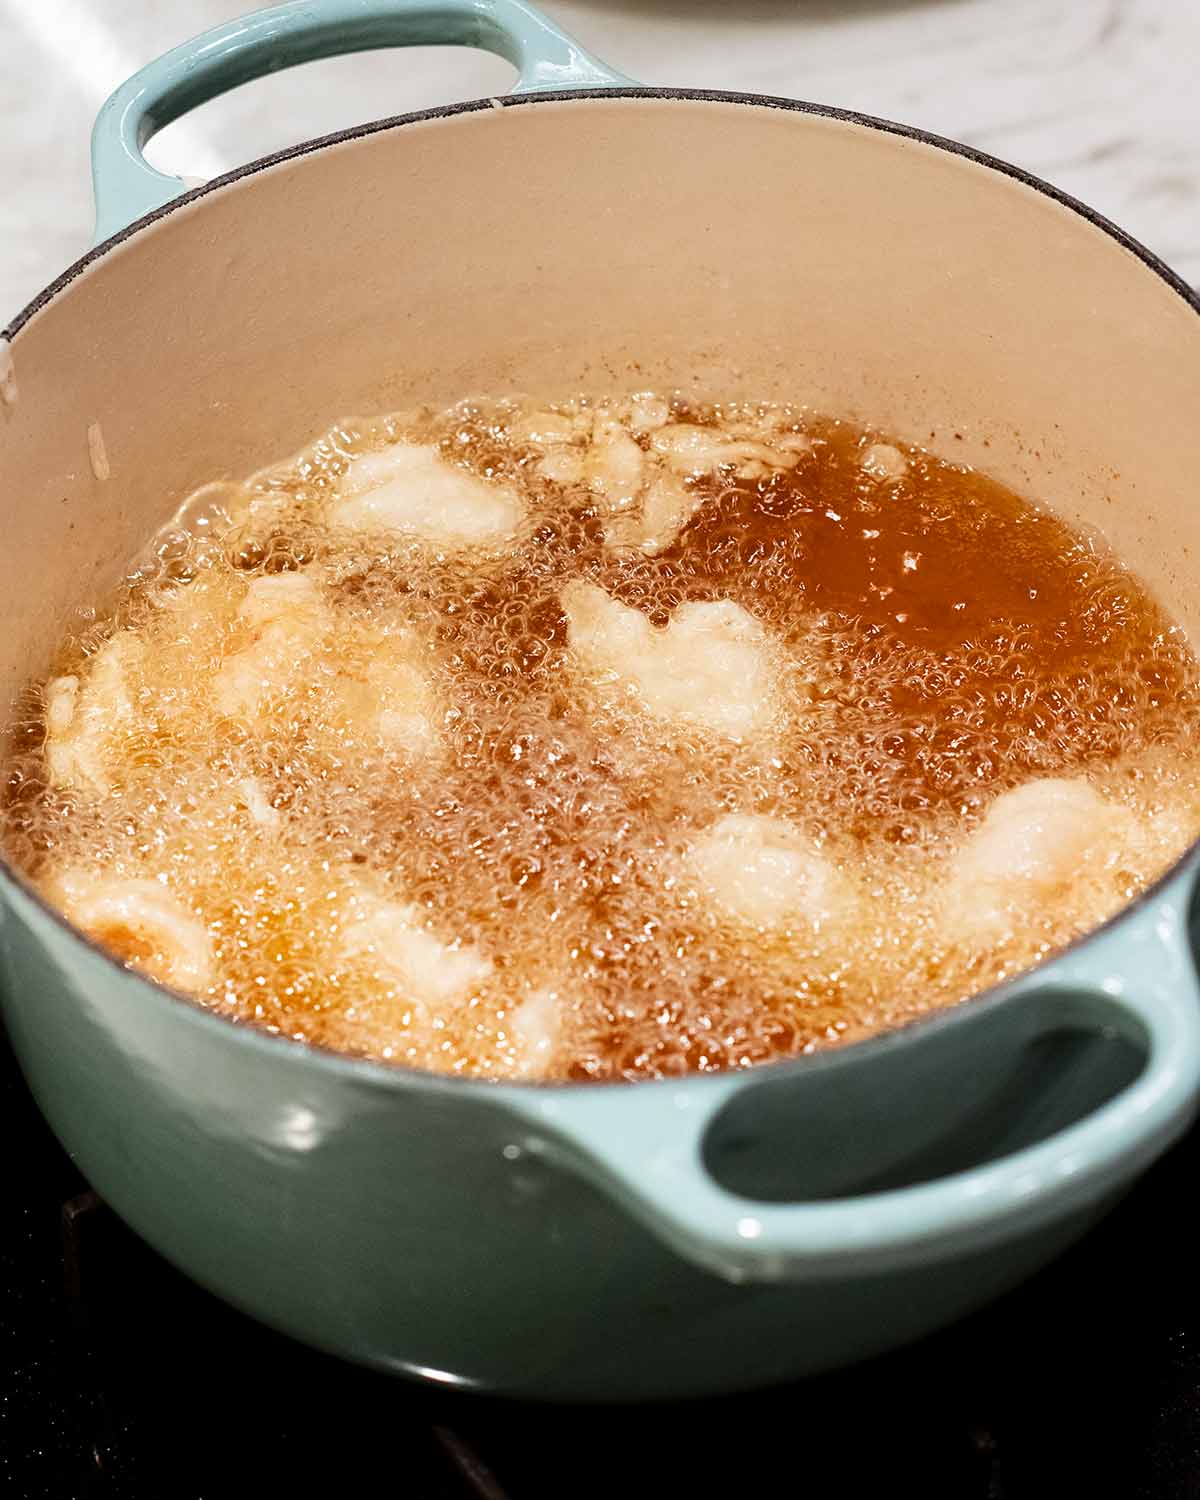
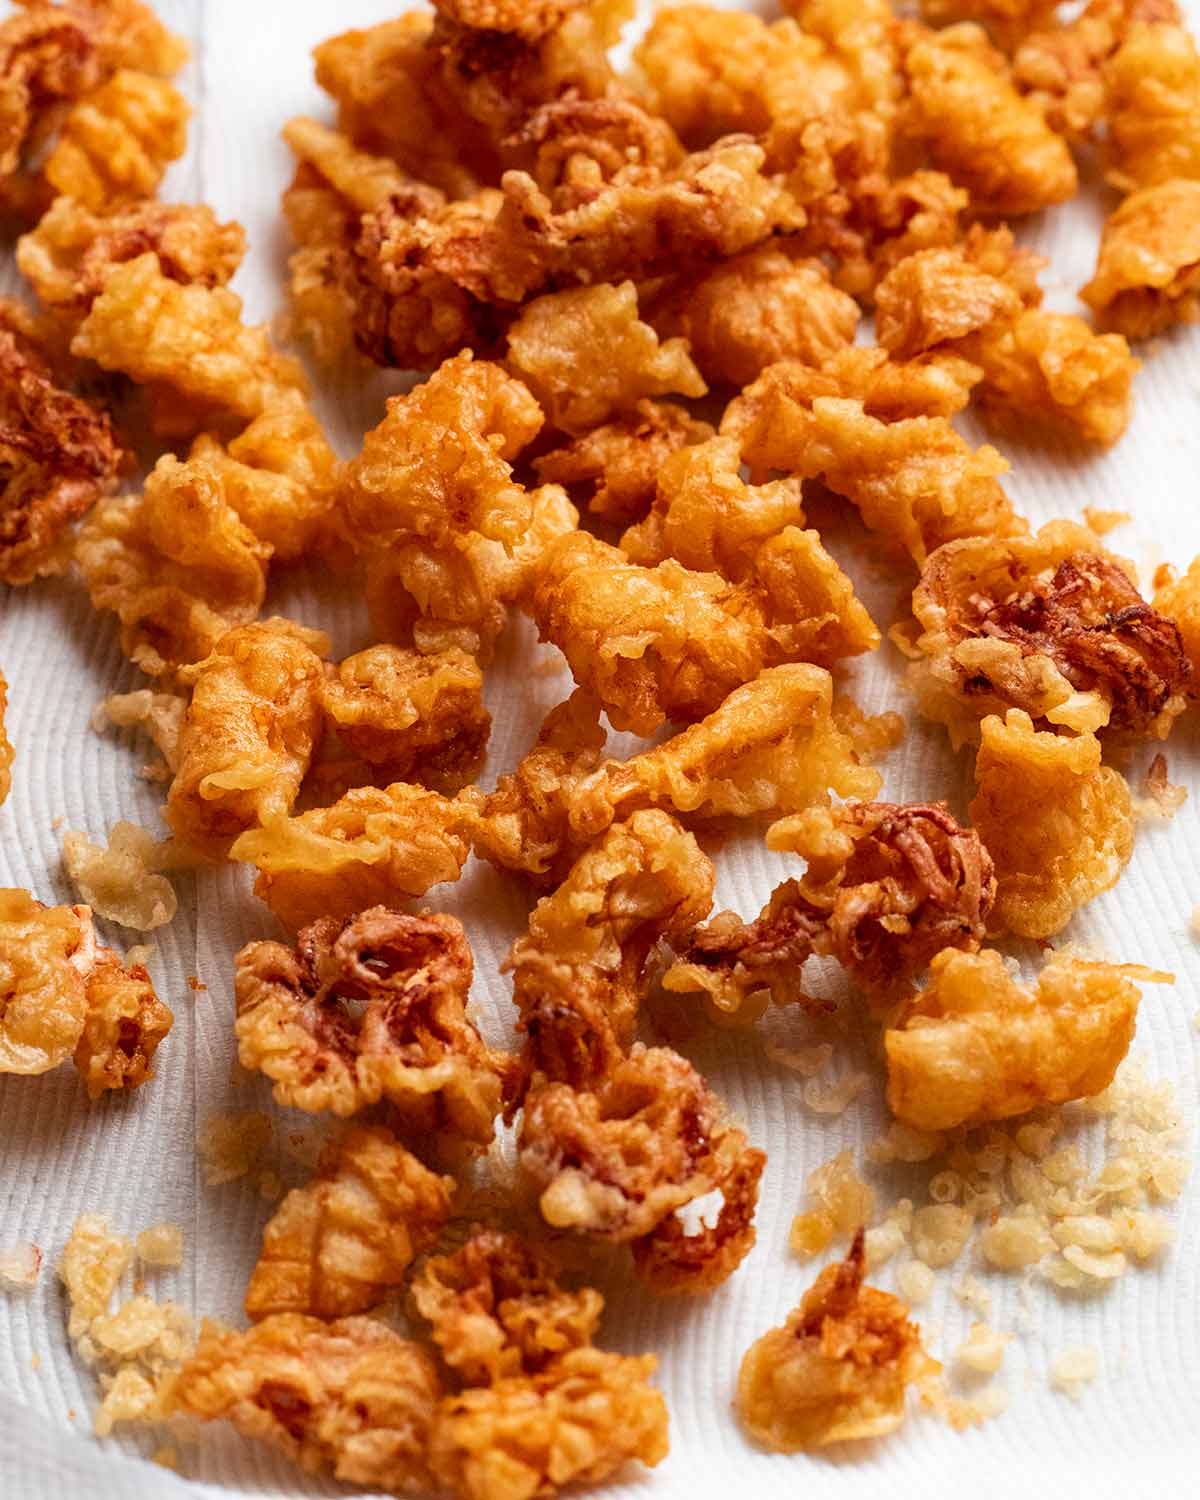
Fry – Carefully put the squid into oil preheated to 160°C/320°F (I use my Thermapen to check the temperature). Fry for 2 minutes (baby squid) or 3 minutes (the squid tubes which are thicker). They should be light golden and a bit crispy, but not super crispy – that comes with the second fry!
The fry time is short because squid cooks really quickly, and nobody wants chewy squid.
-
Drain – Scoop the squid out with a spider or slotted spoon onto a paper towel lined tray to absorb excess oil. Then continue to cook batches 2 and 3.
-
Fry 2 for crispiness – Now, crank up the oil to 200°C/390°F. Then fry the squid in 2 batches for just 90 seconds until it’s very golden and very crispy. This is the step that locks in the crispiness!
You can do this step in 2 batches, it’s ok to crowd the pot.

-
Bowl – Scoop out the squid into a paper towel lined bowl. Taste first before sprinkling with salt and pepper (the batter has decent seasoning in it so you do not want to over salt!) and giving it a good toss.
-
Serve – Pour into a bowl (wait until you hear the clatter in the recipe video!) and serve with Garlic Mayonnaise (Aioli) if desired (literally just mayo + grated garlic). Or just some fresh lemon wedges.
Look how happy I am! It is, of course, because the batter is so incredibly crispy and the squid is so tender!!!

This recipe makes a fairly large batch using 500g/1 lb of squid which, once fried up, will fill a tray. As with most fried foods, I figure if we’re going to make it, let’s make plenty!
It’s a meal for 4 to 5 people or a great appetiser for sharing for 6 to 8 people. And though at its prime freshly cooked, this remarkable fry batter crust will stay crunchy even when the squid is cold and it reheats incredibly well. Just pop the squid in a hot oven for 6 minutes just to reheat the crust and warm the squid inside. Take a bite and marvel at the re-incarnation of the crunch!! – Nagi x
Watch how to make it
See separate tutorial for how to clean baby squid referenced in the video here.
Hungry for more? Subscribe to my newsletter and follow along on Facebook, Pinterest and Instagram for all of the latest updates.

Crispy Salt & Pepper Squid
Prep: 15 minutes
Appetiser, Finger Food, Mains
Western
Servings3 – 8 people
Tap or hover to scale
Ingredients
Squid – choose (Note 1):
Easy aioli (garlic mayonnaise):
Instructions
Preparing squid:
-
Cut one side of the squid tube to lay it out in one flat piece. Pat both sides dry with a paper towel.
-
Lightly score the inside with a small sharp knife in 1.5 cm / 0.6″ diamonds (don’t cut all the way through). (Note 3)
-
Cut the squid into pieces 5 x 2cm (2 x 1″) rectangles (approximately).
Batter:
-
Batter – Whisk the flour, cornflour, baking powder and salt in a bowl. Then whisk in water until smooth. Refrigerate for 30 minutes. (Note 4)
-
Heat oil – Fill small heavy based pot or large saucepan with 4cm / 1.5″ of oil. Heat to 160°C/320°F on medium high heat. (I use a Thermapen to check the temp)
-
Give the batter a quick whisk then add all the squid in a toss to coat. (Including tentacles if using baby squid – it’s the crunchiest!)
Fry 1:
-
Batter – Cook the squid in 3 batches. Pick up some squid and let the excess batter to drip off. Careful place in the oil. Use chopsticks to seperate the pieces that stick together.
-
Fry baby squid for 2 minutes or the regular squid tubes for 3 minutes until light golden. Use a spider or slotted spoon to remove the squid on a paper towel lined tray.
-
Repeat – Fry remaining squid, making sure the oil comes back to temperature before cooking batches 2 and 3.
Fry 2 – crisp it!
-
Increase oil temp – Increase the stove to high and bring the the oil up to 200°C/390°F.
-
Bowl – Line a large mixing bowl with double layer of paper towels.
-
Fry – Place half of the squid in the oil (it’s ok to crowd the pot). Cook for 1 1/2 minutes, until it becomes deep golden and crispy. Remove into the bowl. Bring the oil back up to 200°C/390°F then fry the remaining squid.
-
Season – Remove paper towel. Taste first then sprinkle lightly with as much salt and pepper as you want (the batter has salt in it already). Toss well.
Recipe Notes:
1. Squid – Whole baby/medium squid (sold with skin, head etc on) is smaller and more tender when cooked than the larger thicker squid tubes sold already cleaned (but is still very good in this recipe and I will happily use!). Plus, you get tentacles which are the crunchiest and best part! See photos in post for comparison. Get whole squid cleaned by your fisher monger or see my separate tutorial here for how to clean it yourself (it’s not hard). 700g (1.4 lb) whole baby squid = 500g (1 lb) once cleaned.
2. Cornflour = crunch but doesn’t fry golden, and too much makes a batter that gets stuck in your teeth. Flour = not as crunchy but stays golden. Using a combination works best!
3. Scoring – Helps with extra crispy edges and even, fast cooking = more tender squid.
4. Refrigeration – Lets gluten develop so batter sticks better to slippery squid and won’t be chewy or greasy when fried.
Leftovers will keep for 3 days. It will still be crispy when it cools. Refrigerate then reheat in a 220°C/425°F oven for 6 to 8 minutes.
Nutrition – I can’t calculate, sorry! I can’t guess the amount of oil in each piece. Let’s just say it has more calories than a lettuce leaf but with one bite you won’t care.
More crunchy fried goodness
Life of Dozer
There is no limit to how low I will stoop for him. 😂